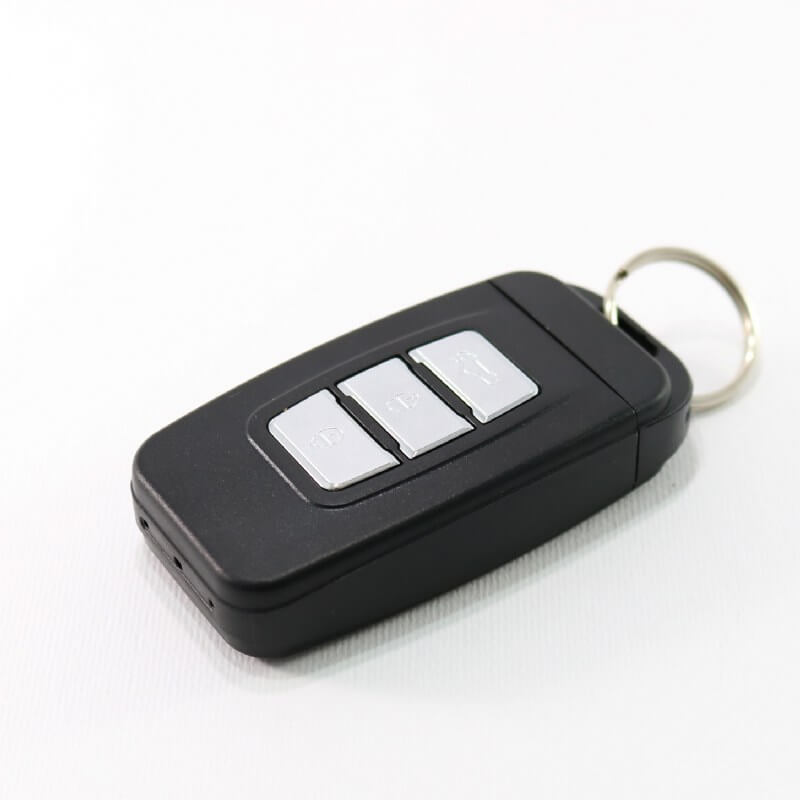
The PV-RC200HDi edition of LawMate's popular Mini DVRs comes with a P2P/IP connection option and records Videos in 1080p.
The PV-RC200FHDi recorder is discontinued and out of stock, however, please find here the replacement product:
LawMate PV-RC200HD2 is a recommended solution for anyone that wishes to covertly record audio and video evidence, or
PV-RC400UW 4K Keyfob Wi-Fi DVR is a new 4K Ultra HD mini DVR with an integrated W-Fi module in a covert keyfob design.
The IP connectivity offers great freedom when it comes to accessing your device from anywhere in the world where there is a Wi-Fi connection. Furthermore, the device can be operated in multiple ways: manually with recording just on the SD card, with a connection to the smartphone via Wi-Fi, or with P2P / IP connectivity.
It comes with the timestamp and overwrites functions, which are great features, especially for professionals in the law enforcement industry.
The vibration on and off function allows you to operate the device without having to focus on the LED indicators. It comes with a 16 GB SD card and supports up to 32 GB SD cards. This device offers MOV & JPG file formats, and a min. illumination of 3.3 lux.
PV-RC200HDi Main Features:
- P2P / IP enabled Full HD Keyfob DVR
- Small pinhole camera
- Records at 1080p/720p/WVGA
- PV Cam Viewer App allows setup, monitoring, live stream and downloading of the Video and Photo materials on your smartphone
- 1080p Video H.264 30fps .mov format
- Vibration mode option for Power/ Rec / Wi-Fi
- LED indicators for power / charging / Wi-Fi / Rec
- Comes with 16 GB SD, and supports up to 32 GB SD cards
- Overwrite & Timestamp functions
PV-RC200HDi Full Specifications:
Camera: 1/3" progressive CMOS sensor
Angle of View: 66°
Video Resoluiton: 1920*1080 ; 1280*720 ; 848*480 (all @ 30 FPS)
Photo Capability:(APP) 2M (1600*1200)
Sensor Resolution: 2304*1536
WI-FI: Built-in Wi-Fi Module(IEEE 802.11b/g/n)
Memory type: Micro SD Card (Up to 32GB SDHC)
Lens: 4 mm
Min. Illumination: 3.3 Lux @ F 2.0
Video File Format: MOV / JPG
Picture File Format: JPEG
PC Interface: Mini USB 2.O
Time Stamp: YYYY/MM/DD, HH:MM:SS
Vibration Alert: On/Off/Record/Low Battery/ Wi-Fi On & Off
Charging time: 120 min(560mA)
Battery type: DC 3.7V / 650 mA high polymers battery
Battery life: Continous recording 60min(Wi-Fi on)/70min(Wi-Fi off)
Recording time: Approx. 300min @ 1080p (16GB memory card)
Dimensions: 71x41x16mm
Weight: 46 g
PV-CAM iOS and Android apps for PV-RC200HDi:

Google Play link:
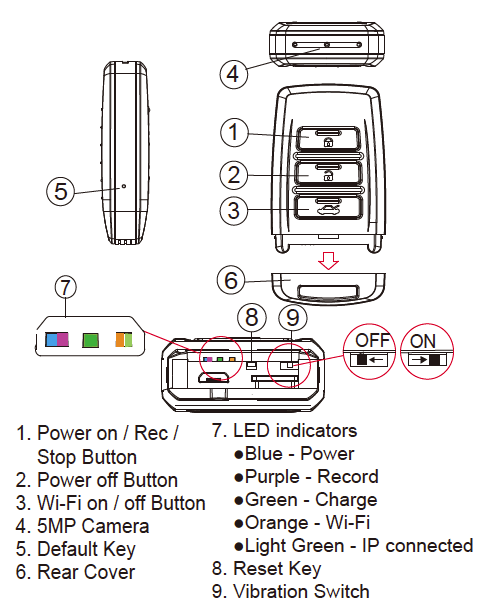
Illustration: PV-RC200HDi Name and Parts from Quick Manual
PV-RC200HDi Feature Focus:
P2P / IP Connection
Due to the router connection of the device, you have the freedom to access your device from anywhere in the world where Wi-Fi is available.
You can always check in on the live stream, download a needed video or photo file, or change the settings.
Overwrite function
The overwrite function allows you to be at ease with the SD card memory, and keep on your keyfob DVR just what you need. This works great for professionals in the law enforcement sector, as not all the recorded material is also needed for evidence. The included 16 GB SD card will provide for hours of recorded materials.
Automatic recording and Off mode
Once the SD card is removed from the device, the PV-RC200HDi cannot be turned on, much like the 2016 keyfob releases, however, a feature that provided less accidental battery drainage which happens sometimes when the keyfob is carried inside a pocket like/with regular keys.
Also, 40 seconds after the device is turned on, it will start to record automatically!
How to use the IP Keyfob Mini DVR:
- Power on the device by pressing (1) once
- Wait for 40 seconds so that the device configures itself - it will start recording automatically. At this point just onto the SD card.
- With the device powered on press the Wi-Fi key (3) for 3 seconds. Now go to your Wi-Fi networks on your smartphone and find the device, it starts with P0***
- Select the device and enter the default Wi-Fi password - 88888888 (it can be changed later, for more info pls consult the PDFs below)
- Now download the PV Cam Viewer App
- Go to device management and add your device manually (ID + Code) or with a QR code. It is on the sticker on the back of the device
- While still in device management, you will now see your device, select the "Settings Icon" that you can see on the right side
- Enter the exact rooter name as stated on your device, pay attention to blank spaces, etc., enter also the router password
- You will see your smartphone switching from the device's network to your network
- Restart the device and wait 2 min
- Press the Wi-Fi (3) key for 3 seconds
- Refresh the App, select the device in Device management, and you are ready to use the IP connection!
Note:
It is very important to enter the exact same router name as stated on your device when configuring it in the App.
Important IP setup Tip - Obligatory deleting of the device from the Device Management section of the App if you wish to switch phones. Otherwise, the device will be linked to the phone via the server and you will not be able to connect to the IP via other smartphone/s.
24 Months Warranty
>>Download detailed specifications (PDF)<<

.jpg)
.jpg)
.jpg)


.jpg)
.jpg)


